ISEO AWS BYOL AMI Installation and User Guide
Launch ISEO Server Instance
This is a preconfigured BYOL instance that’s ready to run, and you will fully own and manage it with your own AWS account. It’s different from SaaS which is a hosted service with hourly fees for the software. Read about what AWS Marketplace is.
1. Login to your Amazon Web Service Console.

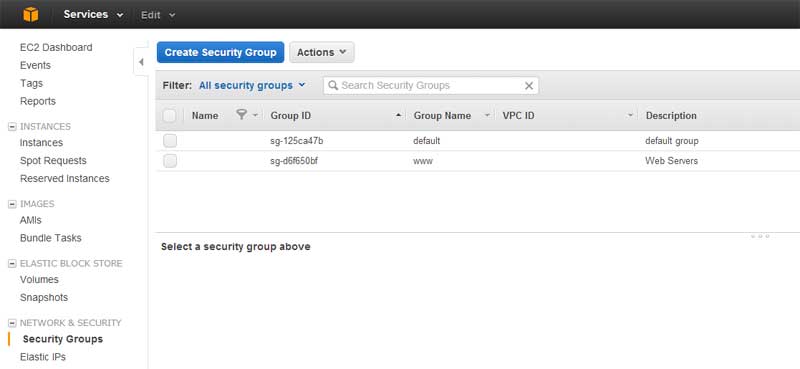
2. You need to configure a security group to run your ISEO AMI. Navigate to the “Security Group” page of the AWS EC2 Web Console
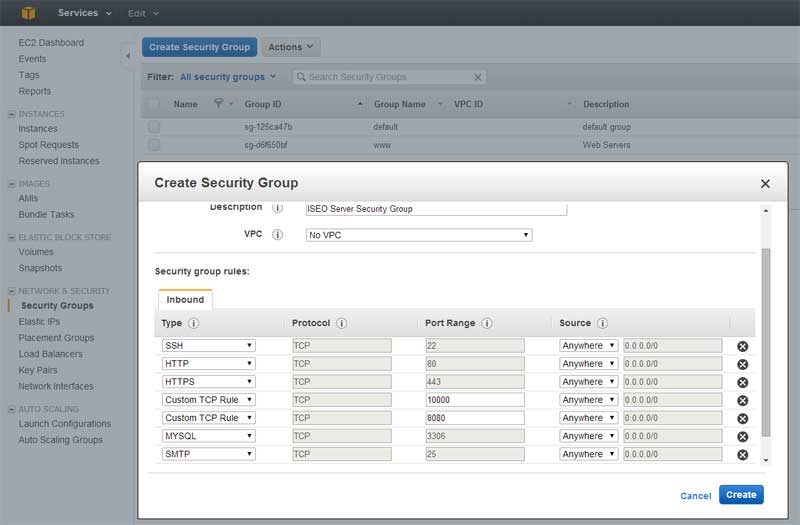
3. Create a new security group with the name “ISEO AMI” and add the necessary ports for your application. At the very least you should open the following ports:
- 22 – SSH
- 80 – HTTP (Varnish)
- 443 – HTTPS (Apache)
- 10000 – HTTPS for the Webmin Admin Panel
- 8080 – Apache
- 3306 – Remote MySQL
- 25 – SMTP
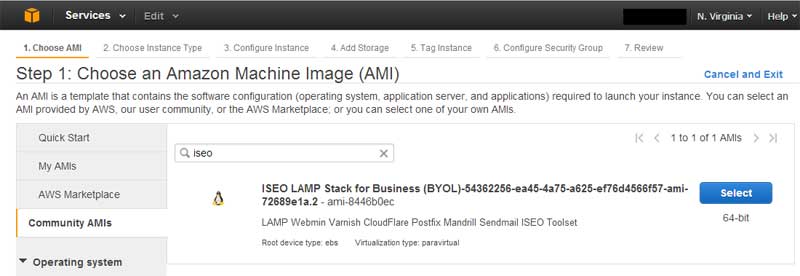
4. Now you’re ready to launch your instance. Click the “Instances” tab and then click the “Launch Instance” button. You will be rederected to a list available AMI’s. Click the “Community AMIs” tab and filter it to just the ISEO AMI AMI’s by putting “ISEO” in the search box and press “Enter”. Once you find the one you want click the corresponding “Select” button for it.
5. Select an Instance Type: t1.micro, m1.large, c1.xlarge. Otherwise the defaults on the Instance Details pages tend to be acceptable. This includes things like kernel and RAM disk IDs and tags.

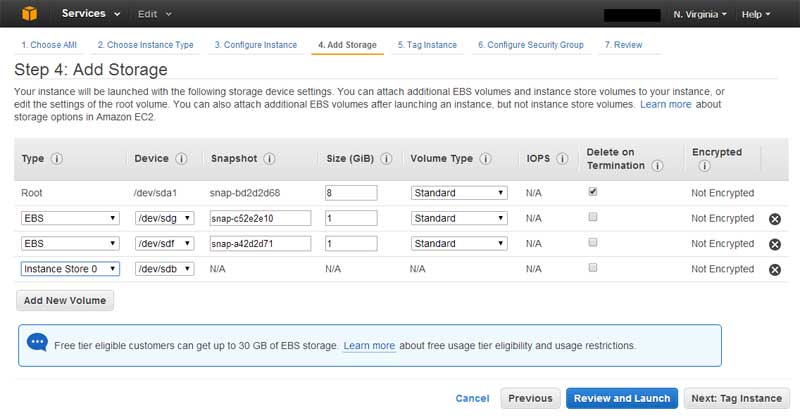
6. Adjust storage sizes to your needs, if your image type doesn’t come with a “Instance Store”, you can create a EBS volume for “/dev/sdb”, Otherwise the defaults on the Add Storage pages tend to be acceptable.
7. Click “Next:” and choose the “ISEO AMI” Security Group you created earlier and then click “Next:”.

Now all you need to do is review your selections and click the Launch button. Click the link to view the instacne status. It will have a status of “Starting up” for about a minute. Once it’s ready it will turn green and say “running.”
8. Click the checkbox to find the “Public IP address.” Save that IP and proceed to “Purchase Subscription License” section.
Note: Shutting down ISEO AMI instance
Note that once your instance is running it will continue to run until you shut it down. If you forget and accidentally leave your instance running you will be billed, by Amazon, for the hours, bandwidth and disk space consumed. To shut down an instance
- Select the instance in your dashboard
- Click on the Instance Actions button
- Choose Terminate (or Stop if you just want to stop it temporarily, you are still charged for disk usage).
Purchase Subscription License
The ISEO BYOL AMI requires a monthly subscription that can be purchased from ISEO Technologies AWS Server AMIs license page. We offer different license options for all EC2 instance types, please choose the correct instance type for your launched instance. Contact us for more information if you have any questions.
Connecting to your new ISEO AMI Instance
Once your new AMI is successfully launched, you will need to SSH into the console using a SSH client software and the private key pair you have used/created previously.
In this section, we will cover the most common case for users using the Windows operating system, and the PuTTY SSH client. If you have a different configuration, please follow Amazon’s specific instructions on how to connect to your instance.
If you have not done so already, download the PuTTY and the PuTTYgen tools from this page: http://www.chiark.greenend.org.uk/~sgtatham/putty/download.html
Launch the PuTTYgen tool. click Conversions -> Import Key. Select the key file you have previously used or generated, and click Open.
After PuTTYgen has successfully loaded your key file, click the Save Private Key button, and save the private key to a safe place. (You may want to protect your private key with a passphrase, although this is not strictly necessary.)

The PuTTYgen tool will no longer be needed at this point. To continue, open the PuTTY client you have downloaded earlier.
In the Host name (or IP address) section, enter the static IP address you have allocated previously. In our case, this is 23.21.108.51.

Then, on the left navigation panel, navigate to SSH->Auth.

Under the Private key file for authentication: section, click Browse… and select the private key file that PuTTYgen has generated in the previous step.

To connect to the server, simply click the Open button. However, to simplify the process in the future, you may want to save these settings as a profile. To do so, return to the Session category on the top, select a name for your session under the Saved Sessions box, and then click the Save button. The settings then can be loaded back by double clicking the profile, or by selecting the profile, and then clicking the Load button.
Upon connecting, you will receive a warning that PuTTY has not seen this server before. It is safe to simply click Yes on this dialog.

When prompted, login as ec2-user, and then press Enter.
If the private key you have specified was correct, you should now be logged in
Update Configuration File and Run Server Installation Script
- SSH into the instance using your AWS private key and username “ec2-user”
Amazon AWS Credentials (http://aws.amazon.com/account/). - Open and edit configuration file, please read “Remote Machine Login and File Transfer” section if you don’t know how to use “vi” editor and want to download and edit the configration file on your local machine.
sudo vi /mnt/vol/cronjobs/iseo_tools/includes/iseo_config.inc - Enter your Paypal Payment ID as ACTIVATION_KEY
- Get your AWS SECRET and ACCESS Keys by following this guide.
- Enter your SERVER_NAME
- Enter your ADMIN_EMAILS
- Update BAK_ROOT_DIR if necessary
- Create your daily and monthly backup S3 buckets by following this guide, and make sure your buckets are in the same Region as your instance.
- Enter your DAILY_BACKUP_S3_BUCKET and MONTHLY_BACKUP_S3_BUCKET
- Create a free Mandrill account and go to the Settings page of the Mandrill interface (link in the top right) to create your API key:

- Do not change other settings at this moment, save the configuration file and run server installation script:
sudo php /mnt/vol/cronjobs/iseo_tools/install.php - The install script will alert you with any configuration errors, if you do run into errors, update the configuration file and run installation script again.
- Close your current SSH session and start a new session, your should see your server “Subscription Status” is set to “activated” /******************************************************************** __| __|_ ) _| ( / ISEO LAMP Stack for Business ___|\___|___| Powered by ISEO Technologies ********************************************************************* Subscription Status: activated License Agreement: http://www.iseo-eur.com/eula.php Installation Guide: http://www.iseo-eur.com/install.php *********************************************************************/
Access Demo WordPress Sites and Webmin Panel
There are two pre-installed empty WordPress Sites installed on this instance to show you how to organize site files, virtural host configuration and use varnish caching VCL.
- Find the public IP of your server instance from your AWS EC2 console and add follow lines to the end of your local host file:
instance_public_ip iseo-demo.com instance_public_ip iseo-demo-nocache.com - Use “demo” for WP backend login username and password.
- Take a look at how site files are organized in “/var/www” directory, please follow this setup for backup process to work properly.
- Take a look at how virtual hosts are configured in “/etc/httpd/conf/httpd.conf”
- Take a look at how Varnish caching rules are configured in “/usr/local/etc/varnish/default.vcl”
- Access your Webmin Panel at https://instance_public_ip:10000/ with username as “root” and “TKfT352N” for the password.
- Access your MySQL server with username as “root” and “demo” for the password.
Post Configuration
You server is up and running now, you might want to update demo credentials before uploading your first site. Here is list of commands that might be useful to you.
Resize the file system for /dev/sdg and /dev/sdf (Optional)
If the EBS volume size for /dev/sdg and /dev/sdf have been extend to geater than 1GB in “Add Storage” step, use the following command, substituting the device name that you want to extend.
# sudo resize2fs /dev/xvdg
# sudo resize2fs /dev/xvdf
To list all device names:
# sudo df -h
Obtaining Your Amazon SES SMTP Credentials
https://docs.aws.amazon.com/ses/latest/DeveloperGuide/smtp-credentials.html
Verifying Email Addresses in Amazon SES
https://docs.aws.amazon.com/ses/latest/DeveloperGuide/verify-email-addresses.html
Allow/reject email relay for a specific recipient or a specific domain
1. Update /etc/postfix/recipient_access

2. Type in the command below in a terminal window to create a hash file.
# sudo postmap /etc/postfix/recipient_access

3. Restart the Postfix service.
# sudo systemctl restart postfix
To enter your own Mandrill settings:
Update "myhostname" to your smtp server hostname in Postfix Main config file:

# sudo vi /etc/postfix/main.cf
...
myhostname = your_smtp_hostname.com
...


Update Mandrill API Key to yours:

# sudo vi /etc/postfix/sasl_passwd
[email protected]:your_mandrill_api_key

postmap the sasl_passwd file after changing it:

# sudo postmap /etc/postfix/sasl_passwd
# sudo postfix reload
# sudo service postfix restart
To update MySQL/MariaDB root password:
# sudo mysql -u root -pdemo
mysql> use mysql;
mysql> update user set password=PASSWORD("your_new_password") where User='root';
mysql> flush privileges;
mysql> quit

Update /mnt/vol/cronjobs/iseo_tools/includes/iseo_config.inc with new MySQL login credentials

Then restart MySQL:
# sudo service mysqld restart

Or restart MariaDB:
# sudo systemctl start mariadb
To update Webmin root password:
# sudo /usr/libexec/webmin/changepass.pl /etc/webmin root your_new_password
# sudo service webmin restart
To access Varnish Admin:
# sudo varnishadm -T 127.0.0.1:2000
varnish>vcl.list
varnish> quit
To restart Varnish:
For v4.7:
# sudo service varnish restart

For v7.2:
# sudo systemctl restart varnish
To register and use CloudFlare CDN:
- Create a free Cloudflare account here.
- Move your domain DNS to your Cloudflare account.
- To learn how to Manage DNS Records with CloudFlare’s Free DNS service.
To set up Mandrill sending domains with SPF and DKIM records:
- What are SPF and DKIM and do I need to set them up?
- How do I set up sending domains?.
- How do I add DNS records for my sending domains?
Remote Machine Login and File Transfer
You may need to connect to the server’s file system to edit configuration files, retrieve log files, upload site files, or run commands from a console interface.
There are a variety of utilities you can use to accomplish these tasks. Following steps demonstrates file transfer using a third-party utility for Microsoft Windows called WinSCP. Command line interactions are shown using the AWS console “Connect from your browser” feature. These two utilities were chosen because they are the easy to explain and use for their use cases. You may be familiar with and prefer other methods, such as PuTTY, ssh command line utilities, and so on.
Requirements
- The public IP address or hostname of the AWS server instance running ISEO Server AMI
- The Public key name associated with the server instance
- The path to the Private key file that works with the Public key mentioned above
- A file transfer utility such as WinSCP
- Important: If using WinSCP, the Private key file must be converted to the .ppk file format. Use the Puttygen “import key” utility to convert from .pem to .ppk file formats. See Dealing with Private Keys in Other Formats for more information.
- Login username: ec2-user
Steps to Transfer Files
- Run the WinSCP application from the Windows Start menu.
- Click New. Use the following values:
- Host Name (or IP address)
- Port number: 22
- User name: ec2-user
- Password: leave blank
- Private key file: navigate to the Private key file
- Protocol: SFTP
- Click Save. The default session name will follow the standard user@host, e.g., ec2-user@iseobox. You can change it if you want. Click OK.
- Click Login to connect.
- Your local file system appears in the left panel and the remote AWS computer appears in the right. You can now easily copy files back and forth between systems.
Command Line Interactions
The AWS console provides a command line utility that runs in a Java-enabled Web browser window. It is documented on the AWS web site.
Command line interactions use cases include:
- Starting, stopping, restarting or checking the status of ISEO Server
- Running any Linux command
Requirements
- Access to the AWS Console
- The path to the Private key file that works with the Public key used by your server instance
Steps to Open a Command Line Window from the AWS Console
- Login to the AWS console, e.g.: https://<yourOrganization>.signin.aws.amazon.com/console
- From the AWS Console Home page, click EC2
- Click Instances from the side bar or Running Instances from the top level summary
- Locate your instance and right-click it
- From the Instance Management pop-up menu, click Connect
- The Public DNS and Private Key name will be entered for you. Complete the following:
- User name: ec2-user
- Private key path: enter the path to the Private key file that works with the Public Key named on-screen.
- Click Launch SSH Client
- When prompted to run the application named com.mindbright.application.MindTerm, click Run
- If prompted to add the server’s fingerprint to the cache, click Yes
- You can now run any Linux command